Getting started with thonny and raspberry pi pico
As discussed, in my last blog I told you how to setup micropython on raspberry pi pico in today's blog I will show you how to control your pico with micropython scripts the IDE we are going to use is Thonny.
You can download thonny from here.
 Thonny

Thonny is an integrated development environment for Python that is designed for beginners. It supports different ways of stepping through the code, step-by-step expression evaluation, detailed visualization of the call stack and a mode for explaining the concepts of references and heap.
Thonny with Pico

Thonny can be use to program Pico and the steps are quite easy.
1.) Connect your board to your system.
2.) Launch thonny now look for "Run" drop down menu and click on select interpreter and from the list select "Micropython (Raspberry pi Pico)".

3.) After selecting interpreter click on Install or update your firmware on the right bottom corner of the screen this will fix any persisting problem with the firmware of your board.

4.) Once these steps have been completed successfully then we have setup micropython environment in our thonny and we are ready to write a script that will control our Pico.
5.) So thonny has two features :
a.) It has script window where we can write the script and save it to our board.
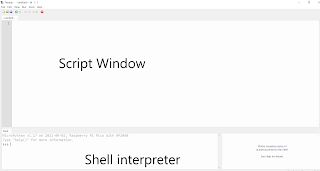
b.) Shell interpreter where we can run some micropython syntaxes to interact with our pico same as we did with PUTTY in the last blog. Those who haven't read the last blog I will drop the link in the end of this blog.

After writing the code let's save it. Press ctrl+s or you can use save button then click on to the pico board.
Once, done click on shell and press ctrl+D it will soft reboot your board and your script will execute.
Facing troubles?
Comment down or you can contact me at :-
E-mail - shikharsinha34920@gmail.com
LinkedIn - https://www.linkedin.com/in/shikhar-kant-sinha-2b9179197/
Link to last blog - Getting started with Pico and micropython.
Stay tuned!!❤


Very informative :D
ReplyDelete